TrEd allows for customizing the appearance of the tree, esp. the content and appearance of node and edge labels, node coloring, edge appearance, and content of the hint displayed when mouse pointer lingers over a node.
The text of node labels (usually consisting of node attribute values) displayed below each node (and/or on tree edges) as well as other properties of the visual appearance of the displayed tree can be specified using so called styling patterns.
Patterns are generally templates for one line of text to be displayed under each node in the TrEd's main window, but some special syntax may be used to specify visual appearance of other parts of the displayed tree.
Patterns may be stored directly in FS files which makes their
setting specific to a file. Because this is not usually very
convenient, TrEd introduces another way to store and orgainze
pattern sets, called stylesheets. In fact,
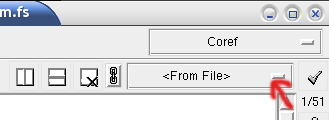
the user may create many different stylesheets. Pattern
stylesheets can be given a name and swithched between using a
stylesheet list shown on the picture below. It can be found on
the right side of toolbar next to the  button. A stylesheet specific for a
file is represented by <From
File> item of the stylesheet list.
button. A stylesheet specific for a
file is represented by <From
File> item of the stylesheet list.
To create a new named stylesheet (based on the current pattern settings), select an item labeled <New From Current> from the stylesheet list and fill a name into the displayed dialog entry. The new stylesheet immediatelly appears as the selected item in the list.
While file-specific patterns are stored directly in the FS files, named stylesheets are saved in a file called .tred-stylesheets in user's home directory. This file is updated every time a pattern-set is modified. Currently selected named pattern set can be completely removed from the list by selecting <Delete Current> item from the pattern-set list.
Selected pattern set can be populated with patterns and modified in
a configuration dialog which is displayed on pressing button or View->Customize
Tree... menu command.
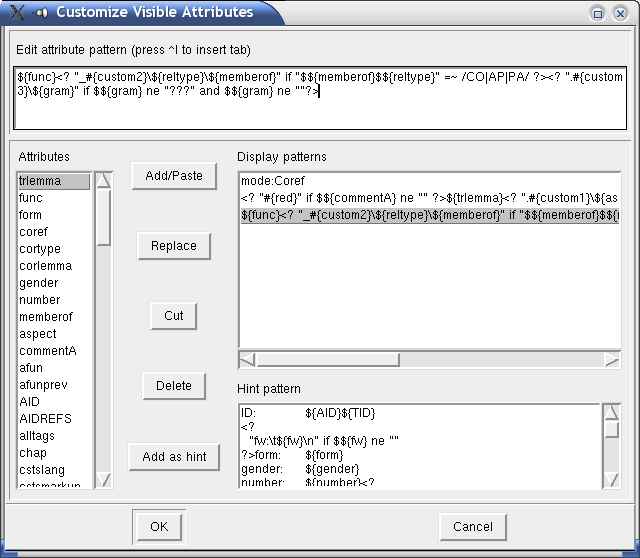
The dialog window contains four main elemens: an editor of individual patterns, an attribute list, a pattern list and a hint pattern editor. Double-clicking an attribute insert attribute reference into current cursor position in the pattern editor or hint pattern editor, whichever is focused.
While literal text occuring within a pattern is copied into the tree (as a node label) without any change or evaluation, the following substrings have special meaning:
- ${attr}
Attribute reference. Any occurence of this substring is replaced by current node's value of attribute named attr. This reference is actually linked with the attribute, so double-clicking the displayed value in the tree shows a dialog where the attribute value can be changed.
- #{color}
This sequence of characters may be used to change the color of any possible following text generated by the pattern. The color may be either an english name of a color, such as black, red or darkblue, or one of ten symbolic names custom0, custom1 to custom9. In the later case, the resulting color depends on current settings of the CustomColor# configuration options (where # is one of 0...9).
- <?code?>
This sequence may encapsulate any Perl code. The code is interpreted in the time of evaluation of the pattern (i.e. just before the line is actually to be displayed) and the result returned by the code replaces the code sequence in the pattern.
Note that the returned value may contain other special sequences, except for another <?...?> sequence.
Within the code, one may refer to any attribute value of the current node with either $${attr} or $this->{attr}. The current node object itself may be referrenced as $this (so it is for example possible to access current node's parent by $this->parent).
- label:
If this string appears at the very beginning of a pattern, the pattern may be treated specially. There are only five pattern labels used by TrEd itself. These are node, edge, style, text and rootstyle. Patterns labeled with any other label are ignored by TrEd but may be queried and used by macros.
Patterns labeled as node are used to display a line of to text under each node of the tree as described above.
Patterns labeled as edge behave likewise but the text is drawn across (or beside) the edge connecting the node with its parent. It is not drawn at all for the root node.
Patterns labeled as style do not result in any text visible on the screen but are also interpolated and the result is scanned for the special tree styling instructions described below that may dynamically alter the appearens of the nodes, edges and text labels of the displayed trees.
Patterns labeled as text may be used to specify string to be displayed for given node in the text field above the tree.
Patterns labeled as rootstyle behave in much the same way as the style but are only interpolated once (for the root node) and the styling instructions defined here have lower precedence than those of style patterns.
- #{object-feature:value}
These instructions may affect appearence of all elements of the tree. They should be used within style and rootstyle labeled patterns only, but may be created dynamically utilizing the <? ... ?> perl-code evaluation.
See Table 1 for list of objects, their features and possible values.
Table 1. Styling instructions
| object-feature | Description and a list of possible values |
|---|---|
| Node-shape | The shape of the point representing the node in the tree. Possible values are oval, rectangle, and polygon (see also Node-polygon below). |
| Node-polygon | Specifies the relative coordinates for three or more points that define a closed polygon. The first and last points may be the same; whether they are or not, TrEd will draw the polygon as a closed polygon. |
| Node-rellevel | Allows altering the default vertical position of a subtree. The values are multiples of one default level height. Positive values move the subtree down, while negative values move the subtree up. |
| Node-level | Very similar to Node-rellevel above, except that this option affects one node only rather than the whole subtree. |
| Node-addbeforeskip | Additional horizontal space before node in pixels |
| Node-addafterskip | Additional horizontal space after node in pixels |
| Node-disableedgelabelspace | If set the value is “yes” no additional horizontal skip for edge labels is added during positioning the node. |
| NodeLabel-valign | This instruction may be used only within rootstyle patterns. It takes one of the following values: “top”, “center”, and “bottom”. This feature specifies which side of the group of node labels should be placed towards the node. If “top” is selected (which is the default value), node labels appear below the node. If “bottom” is selected, node labels are displayed above the node. If the value of “center” is used, node labels are displayed across the node. |
| NodeLabel-halign | One of the following values may be used: “left”, “center”, and “right”. This feature specifies which side of the group of node labels should be placed towards the node. E.g, if “right” is selected (which is the default value), node labels appear left of the node. |
| NodeLabel-yadj | Adjust vertical position of node labels by extra amount of pixels. |
| NodeLabel-dodrawbox | If View->Draw boxes around labels is not selected and this instruction is set to “yes” for a given node , box is still drawn around the node's labels. |
| NodeLabel-nodrawbox | If View->Draw boxes around labels is selected and this instruction is set to “yes” for a given node, no box is drawn around the node's labels. |
| EdgeLabel-yadj | Adjust vertical position of edge labels by extra amount of pixels. The horizontal position is adjusted automatically. |
| EdgeLabel-halign | One of the values “right”, “center”, and “left” may be used to specify which side of the edge label should be oriented towards the edge. |
| EdgeLabel-valign | One of the values “top”, “center”, and “bottom” may be used to specify which side of the edge label should be oriented towards the edge. |
| EdgeLabel-dodrawbox | If View->Draw boxes around edge labels is not selected and this instruction is set to “yes” for a given node , box is still drawn around the node's edge labels. |
| EdgeLabel-nodrawbox | If View->Draw boxes around edge labels is selected and this instruction is set to “yes” for a given node, no box is drawn around the node's edge labels. |
| Oval-dash | Dash pattern for the outline of the point representing the node of the tree. A dash pattern is either a sequence of arbitrary of the following characters “.,-_” where space can be used to enlarge the space between other line elements, and can not occur as the first position in the string, or a comma-separated list of integer numbers specifying the lengths of dashes and spaces between them. |
| Oval-activedash | Dash pattern for the outline of the point when mouse is over the point. See description of Oval-dash for more information on dash patterns. |
| Oval-dashoffset | The starting offset (in pixels) into the pattern provided by the Oval-dash instruction. |
| Oval-fill | The color that fills the node. |
| Oval-activefill | The color to fill the node when mouse is over it. |
| Oval-outline | The color of the outline of the node. |
| Oval-activeoutline | The color of the outline of the node when mouse is over it. |
| Oval-width | Width of the outline of the node. |
| Oval-activewidth | Width of the outline of the node when mouse is over it. |
| Line-coords | This, very complex, option allows to setup one or more lines leading from the node. Unless this option is set, only a line (edge) starting at the node and leading to its parent is drawn. This option may consist of one or more tuples of coordinates separated with & of the form x1, y1..., xn, yn, where x1 through yn give the coordinates for a series of two or more points that describe a series of connected line segments. The coordinates may be either absolute or relative to the node, its parent, or if necessary to any node in the tree. In fact, usual arithmetic expressions may be used to compute coordinates. Use letter n to refer to the coordinate of the current node on the current axes and letter p to refer to the coordinate of the parent node of the current node. Use xn and yn, or xp and yp to refer to a coordinate of the current node or its parent (resp.) on an explicit axis. Coordinates of other nodes may be queried using the following constructions:
|
| Line-arrow | One of the values “first”, “both”, “last”, may be used to make arrow to be drawn on one or both sides of the edge connecting the given node with its parent. |
| Line-feature | Features dash, activedash, fill, activefill, width, and activewidth may be used to style the edge. Their values and meaning is similar to those of Oval, as described above. |
| Text<position>-fill | This feature may be used to set the color of a certain text object. The object is determined by its position which may have one of the following forms: [attribute-name], [attribute-name][n], or [attribute-name][n][m], where attribute-name is name of an attribute, n is the ordinal number of pattern which is the source of the text object and m is ordinal number of the attribute reference (${attribute-name}) within that pattern. |
| Text<position>-activefill | This feature may be used to set the color of a certain text object when mouse is over it. The syntax of position is as above. |
| TextBg<position>-feature | This instruction may be used to set features of an underlying rectangle of certain text object. The syntax of position is as above, except that only the first two forms are accepted, because text objects appearing on one line have common underlying rectangle. The following features are supported: dash, activedash, dashoffset, fill, activefill, outline, activeoutline, width, and activewidth. |
| TextBox-feature | This instruction may be used to set features of the frame drawn around the group of node labels. The following features are supported: dash, activedash, dashoffset, fill, activefill, outline, activeoutline, width, and activewidth. |
| EdgeTextBox-feature | This instruction may be used to set features of the frame drawn around the group of node's edge labels. The list of supported features is the same as that of TextBox. |
The same syntax that applies to patterns applies also to the hint pattern, except that only attribute value and perl code interpolations are accepted. The hint pattern is interpolated and displayed in a floating “tool-tip” like frame whenever user positions the mouse cursor above a node and waits for a while. (The lenght of the time interval may be customized by setting the HintWait option to the desired number of milliseconds).
A new pattern may be added to the pattern list by typing the pattern definition into the pattern editor at the top of the dialog window and pressing the Add/Paste button. The pattern is inserted just before the pattern currently selected in the pattern list (or to the end of the list if no pattern is selected).
To remove a pattern from the pattern list, either the Delete or Cut button may be used. In the latter case, the pattern is copied to the input entry first.
The list of attributes provides a shortcut for inserting ${attr} sequences into the input entry as well as for inserting simple patterns of the form ${attr} to the pattern list.
To insert a simple ${attr} pattern to the pattern list, select attr from the Attributes list and press the Add/Place button. If you press the Add as hint button, the pattern is inserted to the current cursor's position in the hint pattern editor. To insert the above sequence to the current cursor's position on the entry line, double-click the attr item in the Attributes list.