The following paragraphs describe menu commands.
Displays a dialog window with an entry into which the
user can enter a URL or a
filename. TrEd can
downloading and open files at least using http, ftp, and file protocols. Network
protocols (http and
ftp) are read-only. On UNIX systems,
TrEd also supports the SSH
protocol with URLs of the form
ssh://[.
user@]host/remote-filename
Note
Since the current implementation of SSH remote file transfer requires several subsequent login sessions each time a remote file is accessed, it is highly recommended that a password-less access (e.g. using Kerberos or SSH keys) is set up before remote files are opened in TrEd using the SSH protocol.
Additionally to the
protocols already mentioned, TrEd supports a special
protocol indicated by the URL prefix ntred:// used for
communication with BTrEd servers. This protocol allows
to inspect and change trees stored in memory of BTrEd
servers.
A submenu containing a list of recently open files; selecting a menu entry opens the file in the current view.
A submenu containing a list of open files or files that TrEd holds in memory. Selecting a menu entry opens the file in the current view.
This submenu gathers all operations available for working with file lists, see Section 12, “Using File Lists”.
Displays a list box where all file lists currently known to TrEd are listed. The user may switch to another file list by choosing the corresponding item. If the file list was not accessed during the session, the first file on the list is opened and displayed. Otherwise, the file last accessed on that list is re-opened and displayed.
Opens the next file of the current file list in the current view, if any. Unless displayed in some other view, the active file is closed (the user may be asked to save possible changes).
Opens the previous file of the current file list in the current view, if any. Unless displayed in some other view, the active file is closed (the user may be asked to save possible changes).
Create a new empty file list. Files (or node addresses) can be added to the new file list in several ways, e.g. using → → or → → .
Allows the user to select one or more user-defined
file lists and remove them. If the file-list file is
located in the .tred.d/filelists/
directory in user's home, this action also physically removes
the file-list file on the disk.
File lists located elsewhere are kept untouched and TrEd just
removes them from its memory and configuration.
Opens a File List dialog window which allows the user to manage lists, e.g. load them, create them, or add new files to them. See more detail in Section 12, “Using File Lists”.
This submenu allows the user to manage bookmarks. Bookmarks are filenames
with tree-number and node position attached. The list
of user's bookmarks is maintained in a special file list named Bookmarks.
This opens the file, tree, and exact node where the user made a last modification to the data. This is extra position is stored in TrEd's configuration file and does not appear among bookmarks.
Creates a new bookmark for the current file, tree, and node
by adding an entry to the Bookmarks file list.
Adds the current file, tree, and node address to as a new entry in a file list selected by user.
Allows the user to create a new empty file based on an pre-defined template. File templates can be provided by extensions.
Lets the user choose an existing file and creates a new empty file with the same schema or attribute set as the file chosen by user.
Closes the view on the file in the current window. All other views on the file remain untouched. If no other view on the file exists, the file is closed. If the file is modified but not saved, the user is allowed to save it.
Closes the current file and removes it from the current file list. If the file is modified but not saved, the user is allowed to save it.
Saves the active file to the disk. The previous version of the file on the disk is renamed by appending `~' to the filename (according to the well-known UNIX convention for naming of backup files).
This command first asks the user to choose a desired output format, then opens the standard file dialog where new name and location of the file can be specified, and finally runs the command.
Opens the Print Dialog. See Section 11, “Printing Trees” for a detailed information.
These commands focus the or node in depth-first order, navidate vertically or , horizontally among siblings ( or ), horizontally within the whole level ( or ), and along the linear ordering of the tree (, , , ).
Displays the node attribute editor, described in detail in Section 8, “Editing node attributes”.
Creates a new node and connects it as a child of the active node. Initially, all attributes of the new node are empty.
Passes all children of the active node to its parent and deletes the active node. This command is ignored if the active node is the root of the tree.
Makes the the current node a new root of the current tree and the current root its new child. This operation goes in three steps: first the current subtree (i.e. the current node with all its descendants) is disconnected from the tree. The rest of the tree is then replaced by the subtree (i.e. the current node becomes the new root and the original root and its subtree is not attached to the file). Finally, the original root and its subtree is attached to the tree as the child of the current node.
This command displays a dialog box in which the user may
specify a search criterion for a node search. The
criterion is based on regular expressions, wild-card
patterns or literal strings matches for attribute
values. In the dialog, every permittable node attribute
has an editable entry where the user specifies search
criterion for the particular attribute. The user may
choose the type of the search criterions to be a regular expressions,
exhaustive regular expressions (when the whole value
must match), wild-card pattern (where ? matches any character and
* matches any number
of any characters) or a literal string. The type of the
criterion is selected in the Search method option-menu and
applies to all entries.
In the Search file list option-menu, the user may choose a file list to search through. By default, this menu displays entry [Current file only], which is a virtual file list containing just the current file.
When user presses button, TrEd searches for the first matching node in the selected file list. A node matches the criterion if and only if every attribute of the node matches the criterion in the corresponding entry (empty criterions always match). If a matching node is found, the search stops and the matching node is displayed and made active.
This menu gathers commands related to trees.
Inserts a new tree before the current tree. The new tree consists of a root node only. Initially, attributes of this node are empty.
Inserts a new tree after the current tree. The new tree consists of a root node only. Initially, attributes of this node are empty.
Removes the current tree from the file and displays the following tree (or the preceding tree, in case the current tree was the last one in the file). The memory representation of the removed tree is destroyed.
Displays a dialog allowing user to copy trees from the current file into another file currently opened in TrEd. The trees are selected by a comma separated list of ranges. The format of the list is the same as in the Print dialog.
Display a window containing a list of
“sentences” of all trees in a current
file. These “sentences” are computed in the
same way as the content of the text line above the tree,
e.g. using a get_value_line_hook
or the text: stylesheet pattern (see
Section 10, “Customizing Tree Appearance: Stylesheets”), or as a concatenation of
special attribute values (i.e. attributes declared
as @V in the FS
format).
In the list, buttons  display the corresponding sentence in the current TrEd view.
Buttons
display the corresponding sentence in the current TrEd view.
Buttons  are used to select sentences. Selected sentences may be later inserted to tree
selection fields, e.g. in the Print dialog and
in the Copy trees
dialog, by pressing the button
are used to select sentences. Selected sentences may be later inserted to tree
selection fields, e.g. in the Print dialog and
in the Copy trees
dialog, by pressing the button  .
.
All or selected sentences can also be exported as a HTML page. The generated page can optionally contain images of the trees associated with the selected sentences.
Runs the guess_context_hook in order to determine and select a suitable annotation mode for the current file. Note that this is done automatically run when a file is opened; this command is useful when the user wants to return to the ``default'' annotation mode.
Open a dialog window where the user can select an annotation mode. annotation modes are groups of user defined macro-bindings, usually identified with macro packages. See also Section 15, “User Macros”. The current annotation mode can also be selected from the first list in the top right corner of the main window, but this makes changing annotation modes fully keyboard accessible.
Open a dialog window where the user can select a display stylesheet. See Section 10, “Customizing Tree Appearance: Stylesheets”. A stylesheet can also be selected from the second list in the top right corner of the main window, but this menu makes changing stylesheets fully keyboard accessible.
In this menu you can choose between
,
, and
orientation of the tree.
If is selected,
then the orientation is selected automatically
according to the setting of
#{vertical} (which defaults to 0 - horizontal mode)
stylesheet instruction. Otherwise horizonal or vertical orientation is forced, disregarding any current stylesheet
setting.
The default value is controlled by the
DisplayMode
configuration option.
Create and focus a new view by splitting the current
view horizontally. Sizes of the new and old view may be
adjusted by dragging the bar between them. The user may
focus a view by clicking into it. Most keyboard
shorcuts as well as menu and button commands only apply
to the focused view. The focused view is distinguished
from other views by black border drawn around it (both
color and width of this border may be customized, see
HighlightWindowColor
and HighlightWindowWidth
configuration options described below). Inactive views
may be further distiguished using a stipple pattern (see
StippleInactiveWindows
configuration option).
Create and focus a new view by splitting the current view vertically. Sizes of the new and old view may be adjusted by dragging the bar between them. See also little more detailed description of above.
Toggle side panel visibility. The side panel is a panel on the left side of TrEd window offering sever useful widgets, that can be turned on or off individually. The widgets include a read-only view of the attributes of the currently selected node, the current file list, a file-system browser and a list of named macros.
Display a window listing all user-defined menus and keyboard shortcuts (macros) in a selected annotation mode. User may run a macro by double-clicking on a corresponding item in the list, or by pressing the button. In the latter case, the window is closed. There are several other buttons in the window. The first button, Include anonymous macros, controls whether macros available only via keyboard shortcut are displayed, the second button, See Perl names, toggles displaying of a column containing raw Perl name of macros, and another two buttons (Sort by name and Sort by keyboard shortcuts) control the order in which macros are listed. Finally, the button creates a handy reference page from the listing in form of a HTML document.
This menu allows to run, examine and reload pre-defined annoation macros (see Section 15, “User Macros”).
Display a window listing all user-defined menus and keyboard shortcuts (macros) in a selected annotation mode. User may run a macro by double-clicking on a corresponding item in the list, or by pressing the button. In the latter case, the window is closed. There are several other buttons in the window. The first button, Include anonymous macros, controls whether macros available only via keyboard shortcut are displayed, the second button, See Perl names, toggles displaying of a column containing raw Perl name of macros, and another two buttons (Sort by name and Sort by keyboard shortcuts) control the order in which macros are listed. Finally, the button creates a handy reference page from the listing in form of a HTML document.
This menu shows macros available in the current annotation mode. Any macro can be invoked by selecting the corresponding item.
This menu gathers all available macros, and is organized into submenus by annotation modes. Any macro can be invoked by selecting the corresponding item. Note that calling a macro from an annotation mode that was not intended to be used for working of the current type of file can be dangerous!
Here we give only a brief
description of the few macros defined by default in the
default
TredMacro annotation mode
in tredlib/tred.mac.
Although they are general purpose macros, they
should be used wisely, since some of them they allow almost
arbitrary (and possibly unintended) modification of the tree structure.
Note
Only a few of built-in commands in TrEd are associated with a keyboard shortcut (other than the standard menu navigation using Alt and the underlined letter). The aim is to give the users maximum freedom of choice of available shortcuts for their own macro commands.
Close the current file and open the previous file on the current file list. If the current file contains unsaved changes, the user is allowed to save them.
Close the current file and open the next file on the current file list. If the current file contains unsaved changes, the user is allowed to save them.
Copies all values of the active node to an internal clipboard. These values may be pasted to any other node using the command.
Assignes the active nodes attribute values stored in an internal clipboard during the last call of the command.
Cuts off a subtree of the active node and stores it in an iternal clipboard. The cut subtree may be attached later to another node using the command.
Deletes active node. The node must be a leaf and must not be the root of the tree, otherwise this command is ignored.
Promts the user to enter an ordinal number of a tree in the file and displays that tree.
Promts the user to enter an ordinal number of a tree in
the file and displays that tree (depending
on the status of the button
 either in the current view only or in all views).
Creates a new node as a right sibling of the active node (this command is ignored if the active node is the root node).
When invoked, a dialog with an editor for a Perl code snippet is displayed. The Perl code entered by user is then evaluated for every node of the tree in their natural ordering starting from the current node. The evaluation stops at first node for which the Perl code returns true (i.e. a defined non-zero value) and this node is activated.
The Perl code conforms to the very same rules as a
macro, i.e. in brief, the variables $this and $root refer to the active node
and root of the tree respectively. If $n refers to some node, then
$n->{attr} is
value of attr
attribute for the node $n. The parent-node of
$n is accessed via $n->parent, child-nodes of
$n as $n->childnodes (returns a
list), etc. Macros from the current annotation mode may be
called as Perl subroutines. See Section 15, “User Macros”
for details.
Searches the next node satisfying the Perl-expression specified in a previous usage of the command .
This menu gathers tasks related to TrEd configuration and setup.
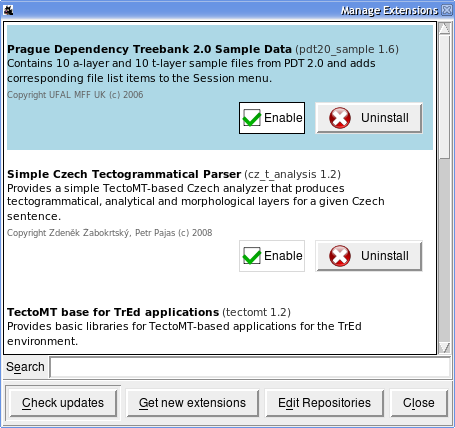
This menu command starts a extension manager in a separate window (Figure 2, “Extension Manager”). The extension manager can be used to enable, disable, or upgrade currently installed extensions, to install new extensions from web repositories and to manage a list of repositories.
Open a dialog box with a stylesheet editor for the currently selected stylesheet. A styleseet defines which attributes should be displayed and defines the tree's overall appearance. See Section 10, “Customizing Tree Appearance: Stylesheets” for more detail.
Reloads display stylesheets This command is useful if you have changed the stylesheets in a text editor or in an another running instance of TrEd. For more information about stylesheets, see Section 10, “Customizing Tree Appearance: Stylesheets”.
Opens the configuration file in a simple text editor (see Section 13, “Configuration and customization” for the details about configuration options). To apply the new configuration, save the configuration file to disk and leave the editor press the button. To apply changes without saving them, press . The button closes the editor without making any changes to the present configuration. A search entry on the bottom of the dialog window can be used for fast case-insensitive searches. While searching, use F3 key to highlight next match.
When editing the configuration file, make sure you only define each configuration option once, since TrEd doesn't give you any warning about duplicated configuration entries. If an option occurs in the configuration file more than once, the latter occurrence has precedence.
Note
Some configuration options even if applied take effect only after restarting TrEd.
Use this command to reload the configuration file from disk and apply the new options. This command is useful if you have changed the configuration file in a text editor or in an another running instance of TrEd. As above, note that some configuration changes still take effect only after restarting TrEd.
Toggle visibility the ``hidden'' nodes and subtrees of
the tree. If this item is checked, TrEd displays nodes
that would otherwise been hidden. A node can be hidden
if the stylesheet specifies a style pattern #{Node-hide:1}
for it, or if it belongs to the subtree of a node with
value hide or 1
in a special hiding FS-attribute (see FS-format description for details).
If this item is checked, inactive views are covered with a semi-transparent stipple pattern. This may improve orientation if working with more than one view, but also slightly reduces the clarity of trees displayed in the inactive views. (See also StippleInactiveWindows configuration option).
If this item is checked, rectangles in the background color are drawn under each individual node label so that text overlapping edges and other graphical elements is legible. (See also ClearTextBackground configuration option).
Toggle highlighting certain attributes with user-definable set of colors. See Section 13, “Configuration and customization” for details on customizing colors and FS-format description to learn about how to specify which attributes are highlighted. In general, it is better to avoid this approach of changing tree appearance in favor of stylesheets (see Section 10, “Customizing Tree Appearance: Stylesheets”).
If this option is checked, all changes in the <From File> stylesheet are preserved even if the file is reloaded.
Toggle sorting attributes by name in all dialog windows
displaying any form of a list of attributes.
By default, sorting is turned on. If turned off,
depending on the format, attributes may be displayed in
order of their declaration in the file or schema. When this option
is on, sorting of attributes may be further altered by
the sort_attrs_hook.
Toggle sorting of attribute values in all dialog windows
displaying a choice of attribute values.
By default, sorting is turned on. If turned off,
depending on the format, values may be displayed in
order of their declaration in the file or schema. When this option
is on, sorting of attribute value choices may be further altered by
the sort_attr_values_hook.
If checked, TrEd will keep the current file in memory until the file is explicitly closed by the user using → or a similar command; in particular, the file will be kept in memory even if another file is opened in the last view using the file. Files kept in memory can be accessed in → .
Displays a submenu where the documentation to installed extensions can be accessed. Unfortunatelly, some extensions come with no documentation.
Displays a submenu where the documentation to various Perl libraries used by TrEd can be accessed, including the TrEd macro API library (Section 15.8, “Public API: pre-defined macros”).
Displays a submenu where the documentation to TrEd command-line tools (including TrEd command-line options) can be accessed.
Displays a window where the user may safely test keyboard bindings. Every time a keyboard short-cut is pressed in the dialog, TrEd looks up if some macro is associated with the short-cut and displayes the result. No macros acrually executed.
Opens the default web browser with a HTML table of macros and key bindings available in the current annotation mode. The page can be printed out and used as a cheet sheet.
Displays the dialog where the information about version, current file name and format, number of trees, and more is given.
In this submenu the user may turn on and off various sets of debugging messages printed by TrEd on the standard or error output (e.g. in a terminal window). The following sets of debugging messages are defined: tred (messages produced by TrEd's GUI), macro (messages issued by TrEd when a macro is evaluated), hooks (messages issued by TrEd when a hook is evaluated), keyboard (messages produced by TrEd when a keyboard short-cut is pressed), backend (messages produced by I/O backends), view (messages produced by the displaying engine and errors raised during style-sheet evaluation).