Netgraph is a client-server application, developed primarily for searching on-line via internet Prague Dependency Treebank, a corpus of Czech sentences annotated on morphological, analytical and tectogrammatical layer. Nevertheless, Netgraph can be used for any other corpus of linguistically annotated trees.
Netgraph consists of two parts - the client and the server.
Netgraph client is a multi-platform program (written in Java2) and can run either as applet in a Java2 (1.4 or higher) enabled web browser or as stand-alone Java2 application.
Netgraph server is written in C and C++. The server is placed at the same internet node as the Prague Dependency Treebank and after a connection with a client is established, it searches the corpus given a query.
Java2 plug-in is a part of Java Runtime Environment
1.4 (JRE 1.4). Follow the installation instructions included in the JRE 1.4
package.
You can find it at http://java.sun.com/j2se/1.4.
If you have Java2 plug-in correctly installed, you can start the Netgraph client applet simply by clicking on the link with the desired language of GUI and window size at the main Netgraph site.
There are some restrictions for the Netgraph client running as an applet:
Netgraph client as a stand-alone application
runs in Java2 Runtime Environment (JRE 1.4 or higher, see http://java.sun.com/j2se/1.4). You have to install it first.
Then, use the package of the Netgraph client application from PDT 2.0 disk (read quick installation inctructions), or download the Java jar-package of Netgraph client from the main Netgraph site, by clicking on the appropriate link.
How to install the Netgraph client application Java jar-package:
Put the downloaded file netgraph_client_application.jar to whatever directory.
How to start the Netgraph client application:
Change to the directory which contains file netgraph_client_application.jar.
The full format for running the program is:
java -jar netgraph_client_application.jar[ name_of_parameter=value_of_parameter]*
You can use these parameters of the program:
lang ... it tells the Netgraph client which localization file to use. Possible values are en (for English localization) and cs (for Czech localization).
country ... the second parameter of localization. Possible values are US in the case lang=en and CZ in the case lang=cs. You need not specify it.
server ... it specifies a URL of a Netgraph server you want to connect to.
c_port ... it specifies on which port the Netgraph server is waiting for connection.
klient_install_url ... it specifies a URL of the directory structure, on which the Netgraph client
looks for help file etc..
An example of starting the Netgraph client application with some parameters:
java -jar netgraph_client_application.jar server=quest.ms.mff.cuni.cz lang=en c_port=2200
Each parameter has its default value, so you do not have to specify any of them.
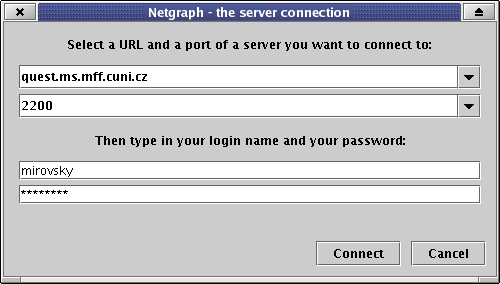
After the Netgraph client (as a stand-alone application) has started, a dialog window appears:
Then the work with the Netgraph client can be divided into three steps:
In the first tab - Files - you can select a subcorpus you want to use in your following work. This is the first step you have to do after the connection to a server.
In the applet version of Netgraph client, this step is automatically skipped and the whole corpus is selected for searching after a connection with server is established. However, user can go to this tab manually and do his custom subcorpus selection, if he wishes to.
The subcorpus selection can be also skipped in the stand-alone application version of Netgraph client, if user wishes to. How to do it is described below.

On the top of the tab you can see informations about the server you have been connected to.
Below the information you can see the directory structure as well as the files. There are subdirectories of the current directory in the first column (named Directories), files in the current directory in the second column (named Files) and custom subcorpus selection (files you want to use for searching) in the third column (named Custom subcorpus selection).
You can browse the directory structure, add files and directories to the list of custom subcorpus selection, remove files from the selection, this all simply by double clicking on names of directories, files, or buttons.
Netgraph can read only the fs type of files at this time. These files contain analytic and tectogrammatic trees.
When the list of custom subcorpus selection is completed (all the files and directories you want to access are listed in the third column), click on the button "use the custom selection for searching". The information will be sent to the server. The GUI will switch to the tab Query.
You can select a previously saved subcorpus to be automatically set for searching the next time you connect to the server. You must perform three steps to achieve it:
In the second tab - Query - you can select trees you want to view from all the trees in the selected subcorpus.
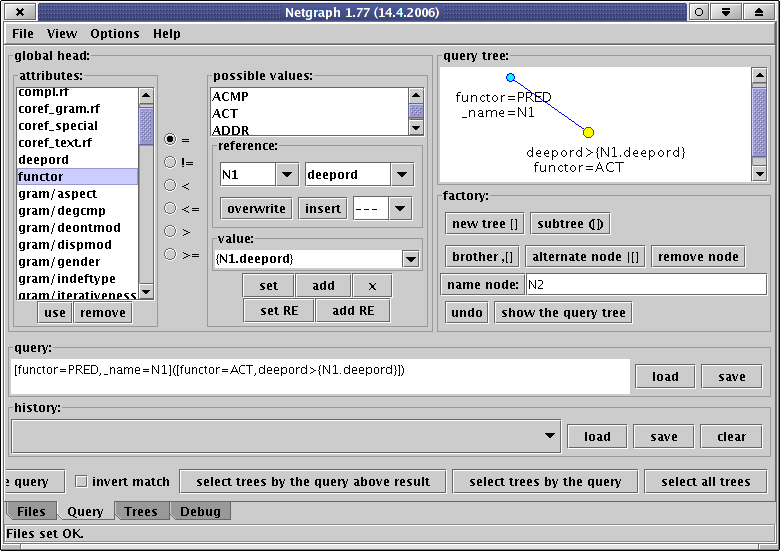
To create a query means to define a subtree you want to be contained in the found trees.
You have to define a form of the desired subtree and you can specify attributes of every node in it.
You can do all of this simply by clicking on buttons in an area entitled factory
(it allows you to define the form of the tree)
and by clicking to the lists of attributes (and their possible values) in an area entitled global head
(it allows you to specify the properties of nodes).
(There is one exception: you have to type values of non-enumeration attributes on your keyboard, of course.)
The other way how to write your query is writing it directly into a text field entitled query. You have to know the right format - it is described below.
You can (and it is a good idea) combine both of the possibilities - to create a query by clicking of mouse and by writing to the text field.
In the left column (entitled attributes) of an area entitled global head you can see all the names of attributes you can use in your queries.
There are several attributes beginning with the character "_" on the
bottom of the list - these attributes are not present in the treebank; they
are calledmeta attributes and allow you to specify queries more specifically. These meta attributes will be discussed later.
The type of some of the attributes is enumeration. After a single click on it there will be displayed a list of possible
values in the right column (entitled possible values) of the area global head.
Every time you click on any button the tree defined in the text field query is displayed in an area entitled query tree.
The size of the font used in the query trees can be changed from the menu options -> font size -> in queries.
[]If the node is not a leaf, after the closing square bracket for this node a left parenthesis follows, which means a switch to a lower level. After it follows another node (again the two square brackets), after it another left parenthesis can follow and so on. A right parenthesis means the return to a higher level. Brothers in a tree are written on one level (within one pair of parentheses) and they are separated by a comma.
Example:

the tree you want to convert:
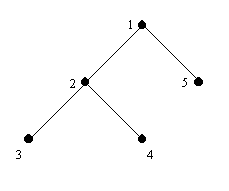
and the converted linear sequence of the tree:

[]([]([],[]),[])

The nodes are numbered for convenience only, to show the order of the nodes in the linear sequence.
Explanation: We begin from the root - the node #1. It is specified by the first pair of square brackets.
A left parenthesis, which means the switch to a lower level, and the node #2 follow.
The next left parenthesis means the next switch to a lower level and the node #3 follows.
This node is a leaf. The nodes #3 and #4 are brothers, therefore they are separated by a comma.
The node #4 is a leaf as well.
Then the first right parenthesis follows, it expresses the return to the previous level.
The node #2 was the last one described on this level. The node #5, a leaf as well, remains.
It is the brother of the node #2 and so they are separated by a comma.
The last right parenthesis meaning the return to the first level closes the sequence.
Example:  [prezident,NMS1A,origf=Prezident,AuxP]

This linear entry matches every node with these specifications:

     the value of the attribute on the first place in the global head is prezident
     the value of the second attribute in the global head is NMS1A
     the value of the attribute named origf is Prezident
     the value of the attribute following the attribute origf in the global head is AuxP
You can use special characters (wild cards) in a mask:
Example:  [origf=?rezident*]

Then the value of the attribute origf can be Prezident or prezidentovi and so on.
You can disable this special sense of the characters by placing the escape character \ before them (two escape characters,
if you write directly to the text field query).
Then the entry \* means really *, \? means ?, and \\ (\\\\ in the text field query) means \.
For using other special characters (those which constitute the fs structure of the query) as parts
of values of attributes, namely [, ], (, ), =, , and |, put one character \ before them only
if you write directly to the text field query.
If you write a value of an attribute into the text field value inside the area possible values and
use buttons set or add, Netgraph copies the value to the actual position in the text
form of the query and automatically puts the necessary escape characters before the mentioned fs-constituting characters.
You can also use alternatives in your queries. The meaning of alternatives is 'or' and there are two types of them.
The first one separates two or more masks of one attribute.
Example:  [origf=Prezident|prezident]

Then the value of the attribute origf can be Prezident or prezident
The second type of alternatives allows you to specify all next variants of masks of all attributes (alternative conditions for a whole node).
Example:  [prezident,NMS1A,origf=Prezident,AuxP]|[prezident,AMP51A]|[prezident,NNS6A]

This is an entry of one node. When searching, only one of the variants needs to match.
There must not be any unnecessary characters (like the space character) in an entry.
Since version 1.77 of Netgraph, you can use Perl-like regular expressions as values of attributes in queries. Just put " at the start and end of a value of an attribute and Netgraph will understand it an anchored regular expression. (Anchored means that it must match with the whole value of the attribute in the result tree.) For example, tag="[AN]...[^4].*" means a tag with A or N as its first character and anything but 4 as its fifth character, which in PDT 1.0 means that the node is a noun or adjective that is not in accusative.
Just like in the normal form of a value (meaning not being a regular expression), you need to use the escape character \ before some special characters (those which constitute the fs structure of the query), namely [, ], (, ), =, , and |. Then, the previous example would be in the text form of the query: [tag="\[AN\]...\[^4\].*"]
Please note that you can only use relations = and != with regular expressions.
If you write a regular expression into the text field value inside the area possible values and use buttons set RE or add RE, Netgraph copies the value to the actual position in the text form of the query, adds the leading and trailing character ", and automatically puts the necessary escape characters before the mentioned characters.
Meta attributes allow you to specify more complex queries and make the Netgraph search language really powerfull. There are nine meta attributes at this time:
After you have named a node using meta attribute _name, you can make references to values of the node from other nodes.
There are two possible ways of it:
You can make references as parts of value masks and you can use more references when specifying one value of an attribute.
There is a bug in Netgraph which has not been fixed so far: do not combine references with meta attribute _#occurrences!
There may be one special attribute among the attributes evaluated in trees, which says if a node is hidden or not. Hidden nodes are not considered to be real nodes and serve for special purpoces.
Hidden nodes are not searched unless a node is explicitely specified in the query as hidden. (Values '0', 'false' and empty value mean that the node is not hidden, all the other values mean that it is hidden. Please note that only relation '=' is valid at this attribute and that it may only be specified at the first set of attributes of a node.) Many meta-attributes do not take hidden nodes into account at all (_#sons, _#descendants, _#lbrothers, _#rbrothers), the others again only if specified in the query.
Hidden nodes are not displayed in trees unless required - see the next chapter Viewing the result of a query for instructions how to show/hide hidden nodes.
In PDT 2.0, hidden nodes serve for referring to lower layers of annotation: to the main parts of the morphological and the analytical layers.
Nodes at the tectogrammatical layer may have one or more hidden sons that say which analytical nodes this tectogrammatical node refers to. The attribute for setting a hidden node is called hide.
In the third tab - Trees - you can browse the trees matching your query, set attributes to be displayed and so on.
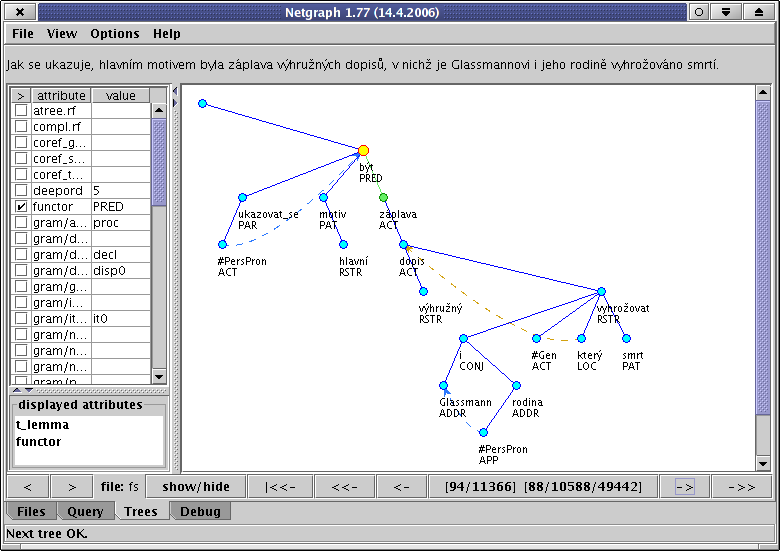
There is usually more than one tree matching your query. The Netgraph client will automatically display the first one. You can click on the button -> (and <-) to display the next (resp. previous) occurrence of the query in the result trees. With some queries, many results may occur in one tree. If you want to skip multiple results (occurrences of the query) in one tree, use buttons ->> and <<-. Use the button |<<- to go to the first result at any time.
When a tree is loaded, the node in the tree matching the root of your query is selected and therefore highlighted by yellow colour.
(In case a hidden node is found (see the section Hidden nodes) and hidden nodes are not set to be displayed, the node is not highlighted (because not displayed at all) - switch on displaying hidden nodes to fix it (button show/hide).
All other nodes and edges matching the query are highlited as well (by
green colour; hidden nodes and their edges are highlited by some other colours).
If necessary, the tree is scrolled so that you can see the matching nodes.
The sentence belonging to the tree is displayed on the top of the tab
and the file name (the tree belongs to) is displayed at the bottom.
If you click on button show/hide, a small menu with two items is displayed:
- show hidden nodes - use this for switching between showing/hiding hidden nodes (hidden nodes are displayed in grey color).
- show coreferences - use this for switching between showing/hiding coreferences.
There is a column with the list of attributes on the left. There you can select the attributes you want to display for each node in the tree. The names of the selected attributes are listed below in the list named displayed attributes. You can see all attributes of a specific node on the left by clicking on the node (the node will be displayed yellow).
There can be more sets of attributes for a node, theoretically. Then,
the circle of the node is emphasized by a small circle inside the common
circle.
The buttons < and > allow you to switch among the sets.
Actually, this possibility is not used in Prague Dependency Treebank.
If any of accented Czech characters (in the sentence, in the tree or in the list of attributes) are displayed incorrectly, try to change the character coding in trees in the menu option to ascii - the accented characters will be converted into unaccented characters.
The size of the font used in the result trees can be changed from the menu options -> font size -> in results.
There is a button with four numbers divided by / between the buttons next tree and previous tree. It shows
statistics about the current searching. Click on the button to refresh the information.
The meaning of the values:
You can save result trees to a local disk if you are permited to (e.g. anonymous user is not).
Select menu -> File -> save result trees.
A dialog window appears:
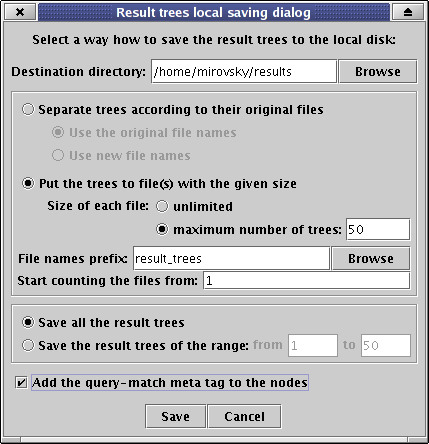
The result trees can be saved to local disk in one file or in several files according to original separation or of a given size.
First, choose a destination directory where you want to put the files to.
Then, select how to separate trees to files. You have several possibilities:
You can also set the range of trees you want to save.
If you check the checkbox Add the query-match meta tag to the nodes, then the information which nodes and edges are parts of query-matching subtree will be added and each found occurrence will be saved separately. Otherwise, if you uncheck the checkbox, each found tree will be saved only once and no information about matching nodes and edges will be added. (Tree editor TrEd (http://ufal.mff.cuni.cz/~pajas/tred/) is able to recognize and graphically emphasize the added information. Please note that you need to set (and uncomment) the option DefaultFileEncoding='utf-8' in TrEd configuration file .tredrc to ensure correct displaying of characters.)
You can print a tree displayed on the tab Trees on a printer. For permission restrictions on unsigned applets this does not work in the Netgraph client as an applet.
For printing a displayed tree on a printer, just select menu -> File -> print.
A dialog window appears:
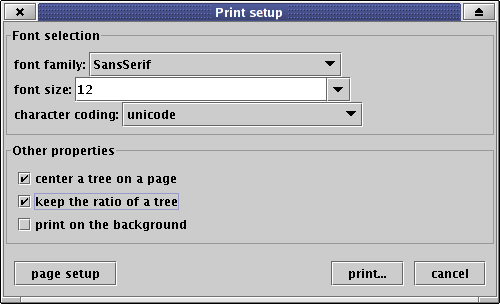
You can select font properties (family, size) as well as the form of the printed tree (center, keep ratio).
If you want the print job to run on the background, check the check box print on the background.
The option character coding allows you to set the way the Netgraph client prints Czech accented characters on a printer.
Press the button page setup to select the paper size and the orientation.
In the end, click on the button print... to select a printer properties and print the tree.